
Campaigns are a flexible, native object that allow you to track your engagement efforts and performance in Salesforce. You can customize the Campaign Member Status values to suit your specific business needs. You can also add, update, and remove Campaign Members to track specific engagements.
This post is the third in a series of three blog posts about Salesforce Campaigns in Lightning. The second post, Customize Campaigns in Lightning, covered how to customize Campaigns in Salesforce for the Lightning admin. This post will provide detailed instructions for how to configure Campaigns Member Status values and Manage Campaign Members in Salesforce Lightning. If you’re interested in an overview of Campaigns in general, I suggest you start with the first post in this series, Salesforce Campaigns in Lightning. Continue reading if you’re ready to get hands on.
User Permissions
Moving forward I’m making some assumptions about you: First, you have at least Create, Read, and Edit access to the Campaigns standard object in Salesforce and the Campaigns Tab is visible. Second, that you have a Marketing User License checkbox selected on your User record. You can’t create or edit Campaigns without these permissions. Finally, you’ll preferably also have the ability to create and edit list views in order to create custom lists to manually add Leads and Contacts to your Campaigns. If you’re not a sysadmin but you’ve been tasked with Campaign management in Salesforce, get these things ASAP.

Campaign Member Status
Campaign Member Status looks like a special field that is used to track the status of the engagement with your Campaign. However, it’s actually a special object that looks like a field. You can’t manage it like a regular picklist.
Every Campaign will default to the Member Status values of “Sent” and “Responded” but, you can customize Campaign Member Status values to be anything you want for any Campaign… but DON’T. It’s a best practice to standardize values across Campaign types. So every Webinar might have Invited, Registered, Attended, and Attended (On Demand), and every Email might have Sent, Opened, and Clicked. but you will most definitely have a reporting nightmare on your hands if some Email Campaigns have “Sent” and “Opened” as Member Status values and some have “Clicked” and “Responded” and Some have “Open-Click”, “Send”, and “Replied”.
- Every Member Status value has the option of being the default value for any newly created Member, but only one Member Status per Campaign can be configured as the default.
- Every Member Status value also has the option of being flagged as a Responded value. Responded values should indicate action on the part of the Lead or Contact. You can use the responded flag to report on successful engagements.
- If marketing automation or API tools update Campaign Members with Status values that aren’t configured on the Campaign, the default Member Status will be set instead. This is why standardization and spelling is so important.
For example you may want to customize an email Campaign with the following Member Status values:

How to customize Member Status values in Lightning:
- Make sure the Member Status related list is added to the Campaign Page Layout. This should only be available to users that are going to be editing these values.
- Click on a Campaign and navigate to the Member Status related list.

- Click View all so you can make sure to see all the configured Status values.

- Click on Change Default Status to change the default

- You can add more values by clicking on New.

- You can edit values by clicking on the arrow and clicking Edit.

- You can remove values by clicking on the arrow and clicking Delete.

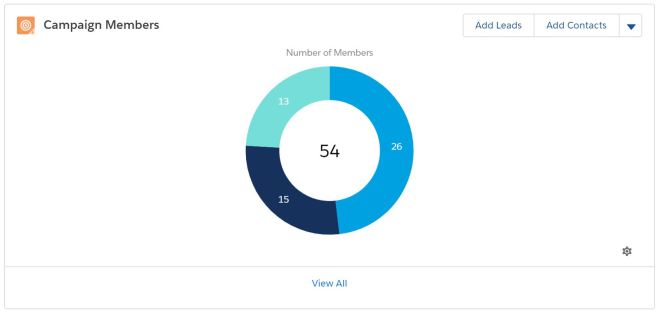
Campaign Member Management
You can manage your Campaign Members in several ways. The following step-by-step instructions will cover how to add Campaign Members from the Campaign, individual Lead or Contact records, List Views, and Reports. It will also walk you through how to update Campaign Member Status, and how to remove Campaign Members. However, I don’t suggest removing Campaign Members from Campaigns unless they were added in error and never actually interacted with the campaign.
From the Campaign
- Navigate to the Campaign you wish to add Members to.
- Navigate to the Campaign Members related list and click Add Leads or Add Contacts.

- You can search for and select the Members you want to add then click Next.

- Select the Campaign, the Status and whether or not you want to update a current Member’s Status or not.

- Click Submit.
From an individual Lead or Contact record
- Navigate to the Lead or Contact record you want to add to your Campaign
- Navigate to the Campaign History Related List

- Click the Add to Campaign button or click the arrow and click Add to Campaign

- Select the Campaign.

- Select the Member Status.

- Click Save.
From a List View
- Navigate to the Lead or Contact tab.
- Click on the gear icon and click New.

- Name your list and click Save.

- Add filter Criteria to your list.

- Select the Members you want to add and click Add to Campaign.

- Your recent Campaign should pop up but if not, you can search for it.

- Select the Campaign, the Status and whether or not you want to update a current Member’s Status or not.
- Click Submit.
Note: The steps to add from an existing List View are the same just navigate to the list you want to source from and begin at step 5
From a Report
Adding members from a report allows you more to use more complex filtering than a list view is capable of, such as cross filters.
- Create or navigate to a Lead or Contact report

- Click the Arrow next to the Edit button in the right corner
- Click Add to Campaign
- Select the Campaign, the Status and whether or not you want to update a current Member’s Status or not.

- Click Submit.
Editing Member Status
- On the Campaign navigate to the Campaign Members related list and click View All.
- Select the Members whose Status you want to update and click Update Status.

- Select the new Status and click Save.


- To Remove Members, select Members, click on the arrow and click Remove.

A Few Additional Notes:
- If the a Lead or Contact is deleted so are any associated Campaign Member records.
- If two Leads are Members of the same Campaign and merged only one Member will remain.
That’s a Wrap!
This three part series provided an overview of Salesforce Campaigns, discussed options for customizing Campaigns to meet your needs using Custom Fields, Page Layouts, and the new Lightning App Builder, and finally took you step-by-step through the process of managing your Campaigns. Hopefully now you feel empowered on your journey using Salesforce Campaigns to track all your engagements in Lightning. There’s still a lot to learn so please enjoy these additional resources. I wish you luck on your Salesforce adventures!
Additional Resources
- The Magic of Campaigns
- How to Use Salesforce Campaigns for Events
- Campaign Management Implementation Guide
- What a Salesforce Campaign Is and Is Not
- Track the Impact of Your Salesforce Campaign Like a Shadow Wolf
- Why You Need to Focus On Defining Campaign Attribution in Salesforce
- Marketing Automation Buyers Guide
I thought you could only edit the status options in classic, so this was really helpful. Thanks!
Yes! The first time I tried to edit Member Status in Lightning: Advanced Setup where did it go?!!? *frantic googling* …It’s a related list now!
Glad this post was helpful!
Thanks for sharing the tips. On the last step about Editing Member Status, if we have a long list of members, there doesn’t seem to be a way to search or create a list view to narrow down the records. Instead we have to scroll thru the whole list to find the specific member(s). Do you have any suggestion?
Hi, thank for the article. Do you know how to change the layout after pressing the Add Contacts button? I’d like to add as column other fields then the standard ones. Thanks!
Sorry for the delay! I believe you modify this by going to the Object Manager, Contact, and Search Layouts.